> For the complete documentation index, see [llms.txt](https://docs.omni.integratedcommerce.io/llms.txt). Markdown versions of documentation pages are available by appending `.md` to page URLs; this page is available as [Markdown](https://docs.omni.integratedcommerce.io/payment-sdk/payment-sdk.md).

# Overview

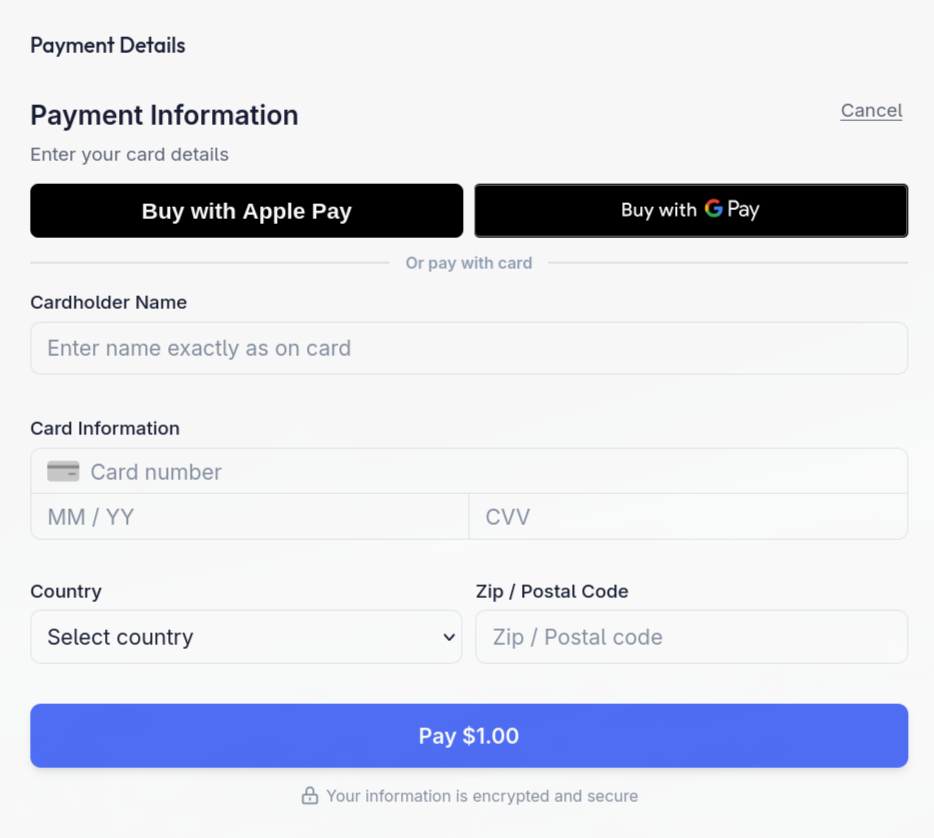
Mount an encapsulated web component into your checkout, with optional Apple Pay and Google Pay.

The Payment SDK embeds a payment form into your checkout page. Load the JavaScript module and call `ic.payment.v1.mount(...)` to display the form with optional Apple Pay and Google Pay wallet buttons.

The form's styles are isolated from your page. Use the [`theme`](/payment-sdk/theming.md) option to customize its appearance.

{% hint style="info" %}
Apple Pay and Google Pay are only available for card-based sale transactions (`POST /transactions/virtual-sale`). Wallet buttons are not displayed for authorization, tokenization, or ACH sessions.
{% endhint %}

<figure><img src="https://2831455276-files.gitbook.io/~/files/v0/b/gitbook-x-prod.appspot.com/o/spaces%2FZEhfhCESvZbNNPd1VI61%2Fuploads%2Fgit-blob-6a64a25d7f9459e44c070853de2e12d6e5eaed00%2Fhpf-wallet.png?alt=media" alt="Payment SDK form with Apple Pay and Google Pay buttons above the card fields"><figcaption><p>Eligible card-sale sessions offer wallet buttons alongside card entry.</p></figcaption></figure>

## Choosing between the SDK and the iframe

|                        | Payment SDK                        | [Hosted Payment Form](/hosted-payment-form/hosted-payment-form.md) |
| ---------------------- | ---------------------------------- | ------------------------------------------------------------------ |
| Integration            | Mount a web component              | Embed an iframe URL                                                |
| Apple Pay / Google Pay | Yes, on card sales                 | No                                                                 |
| Result delivery        | `onComplete` / `onError` callbacks | Redirect, `postMessage`, or both                                   |
| Styling                | `theme` object                     | Fixed                                                              |

Both are backed by the same endpoints and the same `sessionId`, so you can move between them without changing your backend.

## Script endpoint

Load the SDK bundle on your checkout page:

```html
<script type="module" src="https://cdn.omni.integratedcommerce.io/sdk/latest/ic-pay-sdk.js"></script>
```

Call `ic.payment.v1.mount()` after the module has loaded. Put your initialization in a module that imports the SDK, or wait for the script's `load` event.

## Starting a session

To start a hosted payment session and receive the `sessionId` used by `ic.payment.v1.mount(...)`, call one of:

| Endpoint                          | Purpose                                  |
| --------------------------------- | ---------------------------------------- |
| `POST /transactions/virtual-sale` | Process a card-not-present sale          |
| `POST /transactions/virtual-auth` | Authorize a card-not-present transaction |
| `POST /payment-methods/virtual`   | Tokenize a card or ACH bank account      |

Each response includes `sessionId`.

{% hint style="warning" %}
Create the session from your backend, never from the browser. Creating it client-side would require shipping your API key to the customer.
{% endhint %}

## Minimal integration

```javascript
const controller = ic.payment.v1.mount({
  sessionId: response.sessionId,
  container: "#payment-container", // CSS selector, element ID, or HTMLElement
  environment: "prod",
  onComplete: (transaction) => console.log("Payment complete", transaction),
  onError: (error) => console.error("Payment error", error),
});

// Keep the controller for the lifetime of this checkout.
// Call controller.unmount() from your route or component teardown handler.
```

The return value is a `MountController` with a single method:

* `unmount()` - removes the form and wallet buttons and stops their event handling.

{% hint style="warning" %}
Call `unmount()` when the customer navigates away. In a single-page app, skipping it leaks event listeners and can leave a stale form mounted behind a route change.
{% endhint %}

## ACH account holder selection

When you mount an ACH sale or tokenization session, the form shows a Personal Account / Business Account toggle. Personal Account is the default and collects first, optional middle, and last name. Business Account collects a single Business Name instead.

The toggle needs no additional SDK configuration. Both choices collect bank account details and full billing information. See [Personal and business accounts](/payments/ach.md#personal-and-business-accounts) for field requirements and how this choice relates to Checking or Savings.

## Next steps

<table data-view="cards"><thead><tr><th></th><th></th><th data-hidden data-card-target data-type="content-ref"></th></tr></thead><tbody><tr><td><strong>Configuration</strong></td><td>Public options for <code>mount()</code>.</td><td><a href="/payment-sdk/configuration.md">Configuration</a></td></tr><tr><td><strong>Theming</strong></td><td>Match the form to your brand.</td><td><a href="/payment-sdk/theming.md">Theming</a></td></tr><tr><td><strong>Callback payloads</strong></td><td>What <code>onComplete</code> and <code>onError</code> receive.</td><td><a href="/payment-sdk/responses.md">Callback payloads</a></td></tr><tr><td><strong>SDK error codes</strong></td><td>The <code>6000</code>-<code>6999</code> range, by category.</td><td><a href="/payment-sdk/error-codes.md">SDK error codes</a></td></tr></tbody></table>

Wallet buttons require domain validation before they will appear in production. See [Apple Pay and Google Pay](/going-live/wallets.md).
